Uit Magazine van de Caravan Club (GB), November 2000
Re-bedding trim strips
When an awning rail ceases to keep out the weather, an early repair is crucial - as JOHN WICKERSHAM reports
Rainwater can forge a way into a caravan structure as soon as the sealant under trim strips and awning channels starts to deteriorate. Once the bedding mastic dries, gets brittle and cracks, it's only a matter of time before damp penetrates. Then the attachment screws begin to rust. When that happens, every place where screws pass through the aluminium skin becomes a potential entry point for rainwater.
Owners of caravans and coachbuilt motorhomes are thus advised to have these strips removed periodically and re-bedded on fresh sealant. In reality, many caravanners don't have this done - and if a damp area does develop later, the job must be tackled at once.
Re-bedding panel trims is a job that service centres undertake regularly and most of the cost is for labour. So what does it involve?
To show a typical repair, the accompanying photographs illustrate work in progress. Certainly it is not the only way to re-bed components, but like most service engineers, I've developed an approach that has proved effective.
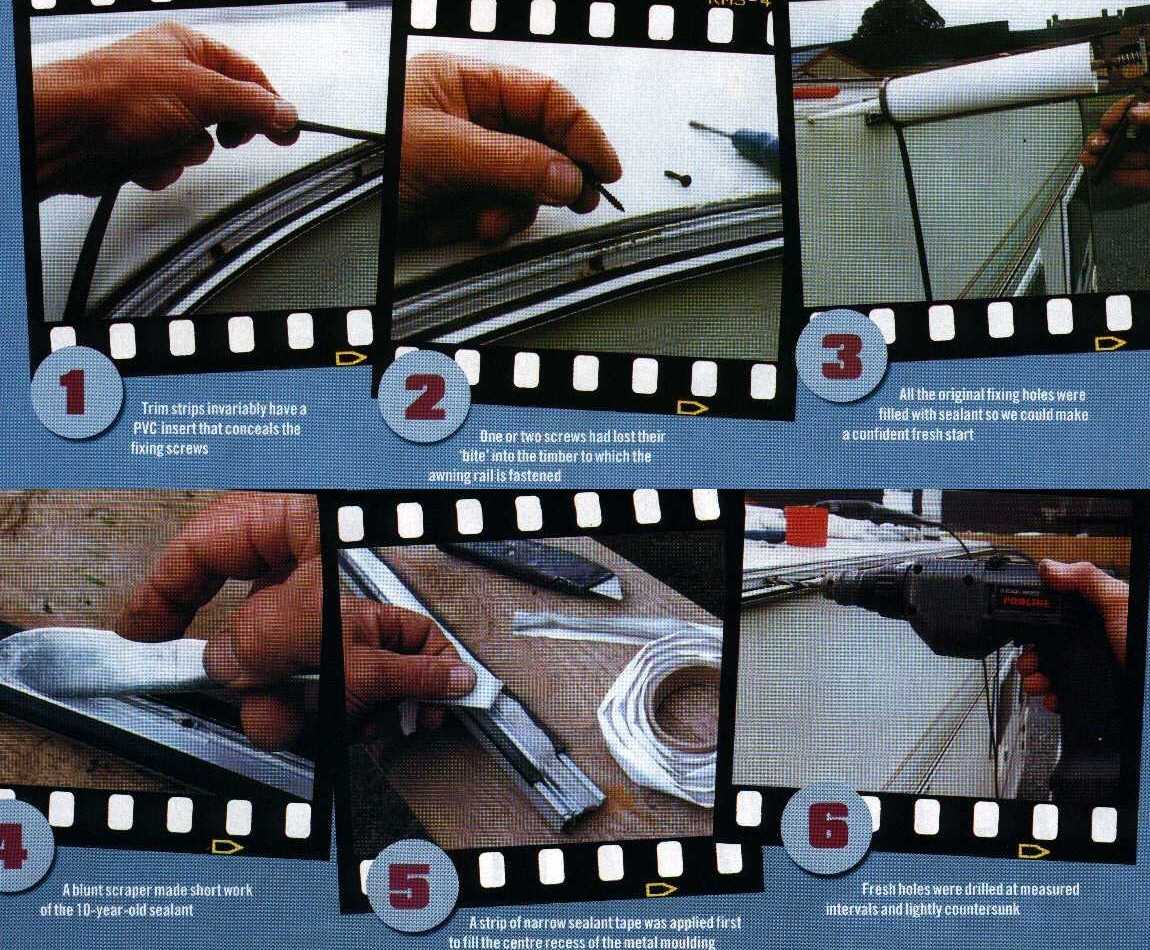
STEP-BY-STEP
On the ten year old caravan shown here, a small damp patch had appeared at the top of an inside wall after a heavy downpour, - a typical sign of a failing awning strip.
Working from an access platform, I inspected the awning channel and it was apparent that the rail wasn't seating firmly against the side of the caravan. Perhaps it had brushed against an overhanging branch at some stage? Water could certainly creep behind the rubber gasket that formed part of the aluminium section. This particular caravan has a boat-style roof with a central ridge - so much of the rainwater falling on the top discharges outwards towards the awning rail. Obviously the rail had to be removed.
Trim strips usually incorporate a plastic insert to hide the heads of fixing screws. As soon as the insert was removed and the screw heads were exposed, I could see they were all rusty. One or two were also fairly loose in the timber batten to which the rail was fastened. Others were tight but so badly corroded that their heads broke off, leaving the stem of the screw in place. That's not unusual.
On this caravan the awning rail on both sides was fitted in two sections with a midpoint join. This made it easy to deal with one length at a time. Because the sealant was dried and crumbling, the section came away with no resistance. Its original location was coated with a fair share of algae.
I used solvent to clean away the deposits, and the broken screws were marked and later withdrawn with pliers. I also decided to fill each of the existing holes with a suitable sealant.
It was woefully obvious that the amount of sealant originally applied by the manufacturer had not been generous. Ten years later the remnants were achieving nothing and I scraped them away from the aluminium extrusion using the blunt end of an old fish knife.
For this repair I used a ribbon sealant for the re-bedding work. Some service engineers use a gun-applied product instead - which is fine provided it's applied properly to achieve good coverage. With a paper-backed ribbon sealant it is easier to create coverage with consistent thickness,- it just takes longer.
In this instance I first used a narrow band of sealant to fill the centre recess in the aluminium moulding, then a second 25mm (1 in) length was added to cover the rubber flange on either side as well. There are alternative ways of going about this, of course, but this approach ensures excellent coverage.
The 'grab'quality of the ribbon sealant used is good, and with a couple of screws used to secure the length in place it was easy to offer up the remaining sections in stages, following the curve of the roof as it did originally.
I decided to use new fixing points and replacement screws that would be rustresisting. I drilled fresh holes at measured intervals and countersunk - but only deep enough to penetrate the aluminium. I used a bradawl to puncture the band of sealant; this helps to prevent it winding around the screws when they're inserted later.
Using a combination of hand pressure and screw tightening, the bedding process was completed and a continuous bond achieved. Then I added the plastic insert using the blund-ended fish knife once again.
Most fitters would leave it there. But recognising that this V-shape roof sends more rainwater than usual towards the sides, I added a very thin beading of gun-applied mastic along the upper edge of the roof part of the rail for further protection.
OTHER APPROACHES
As mentioned already, this is only one of the ways to re-bed a trim section. Another strategy is to dispense with screws completely and use a gun-applied sealant with high adhesive properties -like Sikaflex 221. In practice two or three screws are needed to hold the section in place because it takes several hours before Sikaflex sets. But the bond it achieves is notable - as any manufacturer who has to bond things like the metal cab of a commercial vehicle to the body section of a motorhome fully recognises.
Bear in mind, too, that this report has merely looked at the awning rail. Other trims, particularly the strip running across the top of windows en the front and rear of a caravan, need similar attention. Here's another place where the rain makes an unwelcome entry. Equally on the caravan shown here, there's a ridge strip that runs the full length of the roof. I'm going to tackle that job next.