Source: FRP Enterprise
REPAIR GUIDE FOR REINFORCED FIBERGLASS
This section is designed as the standard guide for repairing fiberglass parts. No matter how much care is taken when making fiberglass parts, some will be damaged or have manufacturing defects.
When a part is damaged or a defect is found, the first step is to try to determine what caused it and what can be done to correct it. The next step is to determine how extensive the damage is and how to proceed with its repair. Most repairs can be broken down into the following categories:
- Shallow Minor Surface Repairs (Repair Technique = Spot Patch)
- Surface Repairs
(Repair Technique = Area or Spray Patch)
- Major Laminate Repairs .(Repair Technique = Patching Holes, Punctures and Breaks)
- Cracked Due To Impact or Stress
Most repairs will need a combination of the above repair techniques. The following sections will be the standard procedures for making the repairs. The intent of the following sections is to insure that quality repairs are made and that standardized procedures and principles are understood.
The Basic Concepts for Gelcoat and Fiberglass Repairs
All repairs will involve either the use of gelcoats and/or fiberglass and resin. A basic understanding of how these raw materials work and how they work together is very important in making a quality repair.
The first important principle to understand is what makes for a good cure. The cure of a spray patch, soft patch or fiberglass patch will determine how well the repairs will look as well as how strong it is.
The major factors which will affect the cure of a repair are: catalyst amount; temperature of gelcoat and resin.
Trying to make quality repair with too much or too little catalyst at low temperatures, using contaminated air lines, is almost impossible to do. Also, one should remember that all patches will shrink and continue to shrink until the cure is complete.
The next step in the repair process is to bring back the surface appearance. Sanding techniques and a good understanding of the use of the various sandpaper grits is important. We use course grits first and then proceed to finer grits until all scratches are gone and the surface has regained its gloss
SECTION A Repair of Shallow Defects
The following procedure is recommended for areas which have damage to the gelcoat only or a blemish that is deep enough to penetrate the gelcoat but not deep enough to go completely through the gelcoat.:
Equipment needed: wax, grinding burr, catalyst, cabosil, putty knife.
- Wax the area to be patched. This will enable you to freely remove any excess putty from the surrounding area of your patch-.
- Grind out the area to be patched with a power burr. Feather the edge surrounding the blemish. DO NOT straight cut the edge.
- Make a smooth, thick, manageable putty by mixing cabosil and gelcoat.
- When patching a part, always try to use gelcoat from the same batch the part was sprayed with. Failure to comply with the rule will almost certainly result in an off-color patch.
- Be sure the area to be patched is clean, dry and free of oil or other contaminates. Even the oils and grease from your fingers when in contact with the ground area will create a dark circle around the patch or cause the putty to fall out.
- Catalyze the putty with 1% - 2% catalyst. (See Section N for proper catalyst amount). Mix thoroughly so no under cured spots will occur in the patch.
- Firmly apply the putty with a putty knife to force out all trapped air.
ALWAYS OVERFILL THE BLEMISH, this will allow for shrinkage.
- Let the patch cure out thoroughly, preferably overnight. If time is a factor, you may speed up the curing process a few hours by applying heat from a 'heat gun or heat lamp. A few minutes is all that is required. Over heating will burn the patch and surrounding gelcoat.
- After the curing process has completely taken place, remove the excess putty around the area with a putty knife. It should chip off freely and smoothly from the area that has not been ground.
- Sand the patch using a sanding block and 180-220 sandpaper. If the patching area is on a sharp radius, a fine file can be used to remove the majority of the putty. The file should never hit the surrounding area, or be used on a flat, smooth surface.
- Sand the area with a block until the patch is flush with the adjoining area and restore the area to its original shape. It is important to hold the block flat to the surface, working in a continuous pattern, so ridges will not be left from the block.
- Examine the area when sanding is completed. If tiny pin holes appear in the patched area or it is not level with the adjoining area, you must reputty. Re-apply just enough putty to fill the holes. Let cure and re-sand.
- Wipe the dust from the area and start the wet sanding process.
- Sand with a block and 400 grit sandpaper in a horizontal motion. Next, use 600 grit sandpaper in a vertical motion. (Read sanding procedures in Section I).
- Compete the finishing process by buffing (covered in Section H). A good carnauba or car grade wax should then be applied for protection.
SECTION B Minor Scratches Not Through The Gelcoat
The following procedure is recommended for fixing surface scratches that are blemishes only effecting the first few mils of gelcoat, not going through to the laminate:
Equipment needed: 320-400-600 grit sandpaper, orbital sander, sanding block, clean water, bucket, buffing compound, buffer and pad wax.
Note 1: Watch the scratch while sanding. Stop sanding immediately when the scratch is removed. If you are not careful, you can sand through to the gelcoat and have to replace it.
Note 2: Keep sanding as close as possible to the scratch so as not to sand through the surrounding area.
- Sand the scratch with 320 grit sandpaper either on a block or orbital sander.
- The next step is wet sanding. Remove all dust from the surface of the area to be sanded. Wet sand with clean water, a block, and 400 grit sandpaper in a horizontal motion.
- Next, sand with 600 grit sandpaper in a vertical motion. It is important to hold your block flat and move it in a continuous pattern to eliminate ridges (read sanding procedures in Section I).
- The next procedure is buffing. Apply a heavy grit polishing compound to the area. Holding the buffer at a 450 angle, buff the area with just enough pressure to remove the remaining scratches. Make sure to keep your buffer moving. Excessive pressure will burn the gelcoat and haze it up.
- Apply more polishing compound. Holding the buffer flat, apply only light pressure. This will shine up the area.
- Wax the area with a carnauba or good grade car wax for protection.
SECTION C Cracks
The following procedure is recommended for areas with stress cracks: Equipment needed: grinding burr, marine grade putty and catalyst, putty knife.
Note: If cracks are through the laminate as opposed to just the gelcoat, additional lamination must be added. If not re-laminated, the cracks will re-appear.
- Prepare the affected area by burring out the cracks. Burr the cracks deep enough so you penetrate into the skin coat. Do not leave any undercuts.
- Use a marine grade filler putty or a resin based milled fiber putty. Catalyze the putty and mix thoroughly so no under cured spots will occur (l%-2%).
- Firmly apply the putty with a putty knife, forcing out all trapped air.
Always overfill to allow for shrinkage. Let putty thoroughly cure.
- When cured, sad out putty with 180-220 grit sandpaper. if the initial sanding is done with a orbital sander, sand putty down until it is just equal, but not quite equal, with the surrounding area. Always finish sanding with a sanding block to restore surface to its original contour (read sanding procedures in Section I).
- All cracks must be regelled. Follow procedure in Section H.
SECTION D Punctures
The following procedure is recommended for repairing fractures or hole punctures that completely penetrate through or are deep into the laminate
Equipment Needed: Power sander, 36 ,80 and 220 grit disc, acetone, fiberglass material, cardboard, resin and catalyst, squeegee.
- Remove the damaged fiberglass from the fractured area or puncture with a power sander with an 36 grit disc.
- Sand outward on all sides of the fracture at least 4 inches. This technique allows the subsequent fiberglass patch to bond to the structurally sound material.
Note: When grinding finished side, be sure to slightly cup out the hole using a feathering motion to make the patch area receptive to patching with graduated size of material.
- After grinding is completed, wipe area with a clean rag and acetone, removing all dust and contaminates.
- Cut fiberglass to the shape of the hole. Cut pieces that get progressively larger.
- Wet out area and fiberglass material with catalyzed resin (l 1/2% - 2% catalyst - mix thoroughly). Apply material in graduated sizes until you are flush with the area. Work out all air bubbles with a brush or roller when applying material.
Note 1: If air bubbles are not removed, they will leave deep voids in the patch after sanding and causing more fiberglass material to be re-applied.
Note 2: Make sure both front and back sides of the area are re-laminated with the fiberglass material.
- When the patch is thoroughly cured, remove the excess fiberglass and restore the original contour to the area with a power sander and an 36 grit disc.
- To bring back the contour after the surface is sanded, apply a marine grade filler putty or resin based milled fiber putty. Catalyze the putty and mix thoroughly so no uncured spots will occur in the patch.
- Use a squeegee at a 450 angle to fair out the putty and fill in any minor indentations in the patched area. Allow putty to cure.
- After curing, remove the excess putty and properly contour the area by sanding it with 80 then 220 grit sandpaper. If the initial sanding is done with an orbital sander, sand the putty down until it is just equal, but not quite equal, with the surrounding area. Always finish the sanding process with a sanding block to restore the surface to its original contour (read sanding procedures in Section I).
- If any dips or pin holes appear after sanding, re-putty, cure and sand again. Use a straight edge to check for a straight, even contour before re-gelling. Follow procedures in Section G.
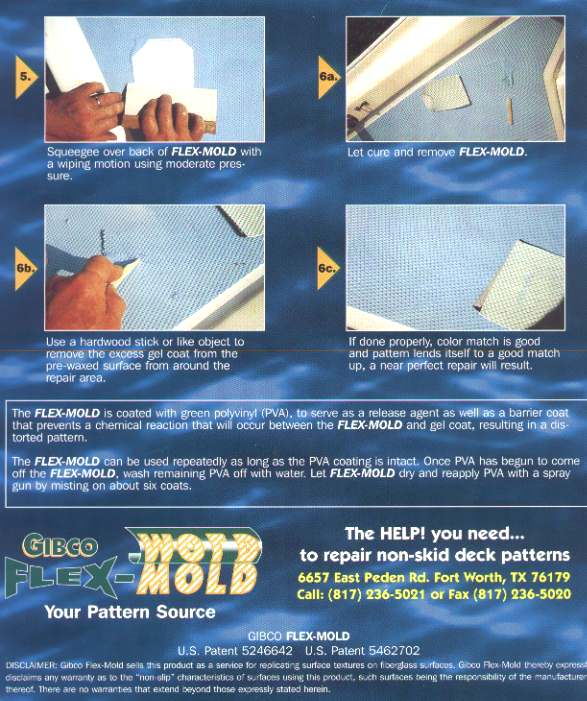
SECTION E Texture Repair
SKID PATTERN REPAIR
SECTION F Surface Detailing
The following procedure is recommended for areas that have a slight discoloration:
Equipment Needed: Soap, clean water, 600 grit sandpaper and block, buffing compound, buffer and pad wax.
- Wash the area thoroughly with soap and water.
- If this does not solve the problem, use 600 grit sandpaper and water sand the area. Make sure the water is clean, eliminating any deep scratches caused by the grit.
- The next step is the buffing process (see Section H). After all buffing is completed, a carnauba or good car grade wax should be applied as a protective measure.
SECTION G Regelling
The following procedure is recommended for regelling:
Equipment Needed:
Orbital sander or sanding block, 220 grit sandpaper, acetone and rag, masking tape and paper, gelcoat, Duratec Hi Gloss Additive and catalyst, spray gun, air gauge, clean water, 400-600 grit sandpaper, buffing compound, buffer and paste wax.
- It is important to have the area re-sprayed and sanded thoroughly, leaving no shiny spots.
- Sand area with 220 grit sandpaper with either a block or an orbital sander. If you have any grooved areas that cannot be sanded with a block or orbital sander and you must use your hand, hold your hand as flat as possible. Do not sand with your fingers as this will cause a distortion in the surface, creating dips or grooves.
- Sand the area twice the size of the area to be re-sprayed.
- Clean the surface using acetone and a clean rag. Any contaminates on the surface to be sprayed will effect the adhesion of gelcoat.
- Tape off the area to be worked on where possible on a sharp break or contour adjacent to the area, even if this means expanding the area slightly in size.
Note: This technique minimizes any slight color or texture differences after spraying. If there are two or more small spots to be regelled in an approximate area, combine them into one larger regelling area.
- Cover with paper any area that may possibly be exposed to over-spray. it is a good idea to mark the adjoining area to indicate where the actual spray spot is. Also, mark your edges for feathering. This will save confusion and make it easier to keep track of where you should concentrate your milage and where you should lighten it up for edge feathering.
- Always use the gelcoat from the same batch the part was sprayed with. FAILURE TO COMPLY WILL ALMOST CERTAINLY RESULT IN AN OFF-COLOR PATCH. If your gelcoat looks as though it has any lumps, strain it first.
- Thin the gelcoat with a 50% mixture of Duratec then catalyze the gelcoat with 1%-2% catalyst by weight (follow the guide in Section M and the chart for catalyst in Section N).
- Stir the mii thoroughly. It is advisable to use a metal putty knife for stirring the gelcoat mixture. A wood stirrer will absorb the catalyst and affect the catalyst percent.
- Using a siphon air spray gun, test the gun on a piece of cardboard or paper and adjust the spray pattern control trigger to regulate the pattern. The two should be balanced. The smaller the area to be sprayed, the more the pattern and trigger nozzle should be closed. Air pressure should be at approximately 20-40 Ibs.
- Position the surface and/or lighting so you can see the spray pattern as it forms on the surface.
- Spray the gelcoat on the patch area uniformly. Avoid producing runs. Move in horizontal and vertical passes while gelling. Allow proper flow to minimize orange peel and to produce sufficient build up for final sanding and buffing.
Note: As you are spraying the area, keep in mind the thin spot that needs to be covered with your heaviest milage. Lower the milage output toward the ends of the sanded area to form a feathering effect.
DO NOT SPRAY OUTSIDE THE SANDED AREA, AS THIS WILL CAUSE PEEL BACK OR FLAKING.
- Clean your equipment immediately after the gelling process is finished to avoid any gel setting up in your gun.
- Thoroughly flush with clean acetone all parts of the gun. Fill the container with acetone, hook up air, and spray through gun, back flushing the siphon tube by blocking the nozzle of the gun to force acetone back. Spray again.
- After the gelcoat has thoroughly cured (preferably overnight), remove the masking tape and start the sanding process.
- Use 320 grit sandpaper with a block or orbital sander. Sand lightly keeping a close visual check on the spot you are sanding. If you see areas that need more sanding because of orange peel, mark that area with a black grease pencil or lead pencil so you know exactly where to concentrate your sanding. When the majority of orange peel is gone, start the wet sanding process.
- With clean water and 400 grit sandpaper on a block, sand in a horizontal motion, taking out the prior 320 sanding scratches.
- With clean water and 600 grit sandpaper on a block, sand in a vertical or diagonal direction, taking out the 400 scratches. This will also bring the shine back to your part more readily.
- The next procedure is buffing. (See Section H).
SECTION H Buffing
The following procedure is recommended to produce a quality finish:
- Start by applying a heavy grit polishing compound to the area. Holding the buffer at a 450 angle, buff the area with just enough pressure to remove the 600 grit sandpaper scratches.
- Use a clean buffer pad. This will eliminate buffing scratches.
- Do not use worn out pads without edges.
- If the scratches do not come out using light pressure, do not try to buff them out. Go back to the 600 grit sandpaper and wet sand again.
- Keep your buffer moving, try not to heat up the area.
- Excessive pressure to the buffer or excessive heat generated from the buffer will burn the gelcoat and make the area hazy.
- To restore the gloss to the area, apply a finer grit buffing compound. Holding the buffer flat, buff the area applying no more pressure than the weight of the buffer.
- Restoring the gloss to a fiberglass product takes very little time yet enhances its appearance considerably, giving it an almost "like new" shine. For protective measure, wax with a good carnauba or car grade wax.
SECTION I Sanding
The following is recommended for properly sanding fiberglass:
- When using a D.A. or orbital sander, apply the sandpaper to the pad, then place the sander flat against the part, then start the sander. STARTING THE SANDER FIRST, THEN BRINGING IT TO THE PART CAN CAUSE DIPS OR GOUGES.
- If the initial sanding of putty is done with an orbital sander, sand the putty down until it is just equal, but not quite equal, with the surrounding area. Finish sanding with a sanding block. This will give a straight and fair finish to the contour.
- When block sanding, always hold your block flat and apply the sanding block in a continuous vertical and horizontal pattern across the area so ridges will not be left from the block.
- Never "finger" sand. This will cause a distortion in the surface.
- If you have a puttied area on a sharp radius, take down the initial putty with a fine file. File the putty down until it is level with the surrounding area, without hitting the surrounding area.
- Finish the sanding process with a block to restore the area to its original shape. Never use a file on a flat surface.
- If tiny pin holes appear in the patched area or the patch has shrunk to the paint where the surface is not flush with the adjoining area, it will be necessary to reputty. Apply just enough putty to fill in the holes. Let it cure and re-sand with a block.
- Next, wet sand the area. Keep the surface you are sanding and the water clean. This will eliminate any scratches that are caused by the grit sandpaper. Be sure to keep the sandpaper and surface wet.
- It is important to have a good understanding of the use of various sandpaper grits. We use coarser grits first and then proceed to finer grits until all scratches are gone and the surface has regained its gloss.
- After sanding with 180-320 grit sandpaper, start wet sanding with a 400 grit paper to get out the 320 grit scratches. Proceed with 600 grit sandpaper to take out the 400 grit scratches. This would be your final step BEFORE buffing. It pays to put extra effort into this step, so you will not have to do a lot of buffing. Sanding with 600 grit will also bring the shine back to the part more readily.
SECTION J Puttying
The following is the recommended procedure for properly puttying fiberglass:
- Before grinding out a void to be puttied, wax the surrounding area to enable the excess putty to be removed easily with a putty knife. This will reduce the sanding process.
- After completely burring out through the gelcoat in a feathering motion, make sure the area is free from dirt, oil or contamination. Even the oils from your hands will cause the putty to fall out or create a dark ring around the patch.
- Always overfill the patch slightly to compensate for shrinkage during the curing process.
- Curing overnight is preferable, but if time is a factor, use a heat gun or heat lamp to speed up the curing process. Much care should be taken when using this procedure since only a few minutes of heating is required. Overheating will burn the patched area and surrounding gelcoat.
- Covering the putty with wax paper will also speed up the curing process.
- Ambient temperature should be no lower than 65" when curing is taking place (for correct catalyst percentage, refer to Section N).
SECTION K Helpful Hints
- To speed up the patching process and for patching in cold weather, use a heat gun. CAUTION: OVERHEATING CAN CAUSE BLISTERING AND POOR COLOR MATCH.
- When spraying,...only thin gelcoat with Duratec.
- Spray patches generally match better than spot patches.
- Different colors behave differently in patching.
- As a rule, keep any patch as small as possible.
- DO NOT thin out gelcoat with acetone. Use Duratec and follow mixing guide. (See Section M).
- DO NOT use lines with oilers on them.
- Set air pressure from 20 PSI to 40 PSI.
- Keep over spray down with correct air pressure and fan adjusting.
- DO NOT try to build up a spray patch too much too quickly or it will run.
- Clean spray guns immediately after use.
SECTION L Trouble Shooter Guide
Color does not match
Wrong batch used to patch, fillers added, too many accelerators added, catalyst level off, patch under cured, trapped solvent, dirty spray gun
Patch is dull
Under cured, catalyst level off, temperature, sanding too soon, trapped solvent, PVA sprayed too wet
Sand Marks
Sandpaper is too coarse (work up to 600 wet), rubbing compound used in last step, dirty buffing pad, under cured
Ring around patch
Edges not feathered, not sanded properly, porosity in original gelcoat (may have to be over sprayed), uncured patch
Crack re-appears
Crack was not fully ground out, weak laminate
Patch is glossy,part dull
Original gelcoat under cured, buffer develops too much heat
Porosity or void in patch
Not sprayed or leveled properly, filler not mixed in properly, trapped solvent, air not worked out
Patch is low
Patch will shrink...allow for this by over filling. Do not sand and finish until patch is cured.
SECTION M Instructions For Use Of Duratec Hi Gloss Additive
Gelcoat Repair Spray Application
Use Duratec Polyester Hi-Gloss Additive to repair clear or pigmented gelcoated FRP parts. The end result is a low porosity, smooth, high-gloss, hard surface that is similar in appearance to the original gelcoat surface. Duratec Polyester Clear Hi-Gloss Additive will reduce subsurface porosity and orange peel, increase impact resistance, improve gloss retention and heat distortion temperatures.
Application Conditions
The surface should be clean, dry and free from oil, grease, wax or other contaminants. Ambient temperature should be in excess of 60°F 16°C to ensure a rapid and complete cure. Time calculations are based on temperatures of 77°F, 25°C.
Surface and Product Preparation
Thoroughly sand the area to be repaired to a 80-180 grit finish.
Blend and mix completely equal parts of Duratec Polyester Clear Hi-Gloss Additive and the gelcoat required for the repair or overspray. Catalyze at 2 percent with mekP catalyst (20 cc per quart).
Application Procedures
Note: Spray pressures should be 35-50 psi. If a pressure pot is used, provide 10-15 psi pot pressure.
Spray the entire surface to be repaired with a fine mist coat and wait 2 minutes for the solvents to flash off. Follow with wet coats, overlapping the surrounding area to ensure complete coverage.
Note: Do not inhibit the cure by adding wax surfacing agents. The combined gelcoat and Duratec polyester Clear Hi-Gloss Additive will air cure to a hard, glossy finish in approximately 1-2 hours. (Apply forced-air heat for a 30-minute cure time.)
Lightly sand the repaired area with 320-800 grit sandpaper, either wet or dry, and buff to the desired finish, ensuring that the newly gelcoated area is blended with the surrounding gelcoat surface. Use Aqua-Buff 1000-W Fast Cut Compound and Aqua-Buff 2000 Compound/Polish to achieve swirl mark-free finish.
To Learn More About Duratec Visit Their Site http://duratec1.com
SECTION N Catalyst Concentration Chart
CATALYST CONCENTRATION CHART M.E.K. PEROXIDE PERCENT BY VOLUME MEASURE. AT 72 degrees F
|
RESIN |
GELCOAT |
|
VOLUME |
3/4 % |
1 % |
1 1/2 % |
1 1/4 % |
1 1/2% |
1 3/4 % |
2 % |
|
1 OZ |
4 drops |
6 drops |
9 drops |
8 drops |
10 drops |
12 drops |
13 drops |
|
2 OZ |
9 drops |
12drops |
18drops |
16 drops |
20 drops |
23 drops |
26 drops |
|
4 OZ |
17drops |
23drops |
35drops |
32 drops |
40 drops |
46 drops |
53 drops |
|
8 OZ |
1.75 cc |
2.3 cc |
3.5 cc |
3.2 cc |
4 cc |
4.6 cc |
5.3 cc |
|
1 pint |
3.5 cc |
4.6 cc |
7 cc |
6.5 cc |
7.8 cc |
9.3 cc |
10.6 cc |
|
1 quart |
7 cc |
9.2 cc |
14 cc |
13.1 cc |
15.8 |
18.6 cc |
21.3 cc |
|
# 10 can |
23 cc |
30 cc |
45 cc |
43 cc |
51.4 cc |
60.8 cc |
65.9 cc |
|
1 gal |
28 cc |
37 cc |
56 cc |
52.5 cc |
63 cc |
74.5 cc |
85.3 cc |
|
5 gal |
140 cc |
185 cc |
280 cc |
262.5 cc |
315 cc |
372.5 cc |
426 cc |